Contents
Overview
Twins - Remastered: Obstacle Creator is used to create Obstacles for the game Twins - Remastered. This help site was created to aid you in understanding how the software works as well as to help you use it propery.
What is an "Obstacle?"
An Obstacle in Twins - Remastered is essentially a collection of world objects which appear in a pre-defined pattern.
There are three different types of Obstacles in Twins - Remastered:
(You can read more about the three different types of Obstacles and how they work by clicking here)
About the Software
This software provides a relatively simple user interface for designing Obstacles for the game, however, since I made this software in quite a rush, it's still not nearly self-explanatory or easy-to-use. Hopefully by using this help site you'll be able to quickly learn how to create Obstacles using this software, as well as have it as a reference to look to if you forget something and want a refresher.
This help page will cover everything that you need to know to get started creating Obstacles in the Getting Started page. However, if you're looking for a more in-depth explanation of a specific element or if you're looking to gain an advanced understanding of the software or the way the software interacts with the game, more information can be found in the rest of the pages on this site.
Getting Started
A picture of the Obstacle Creator:
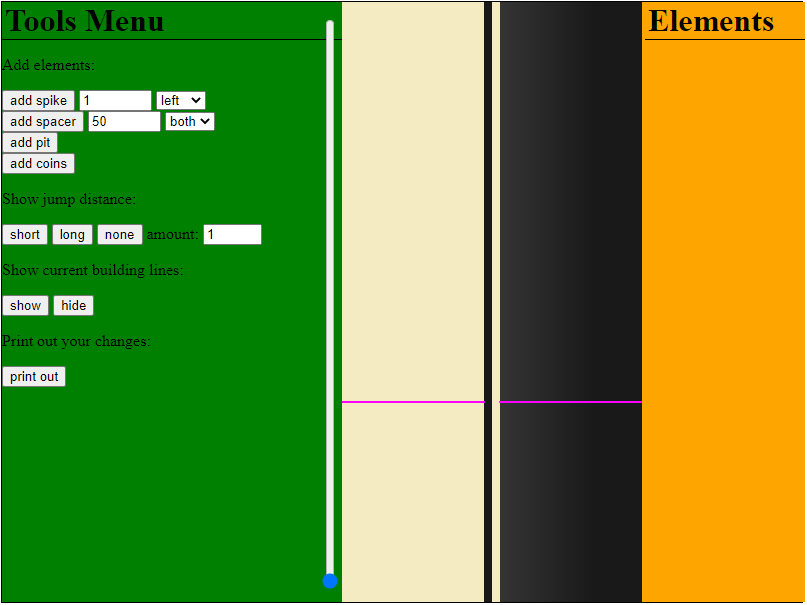
The Obstacle Creator is devided into 3 main panels:
The Tools Menu
Let's take a look at all the things that can be done from within the Tools Menu.
The Tools Menu is used for adding elements to your Obstacle (such as adding Spikes or Pits), while also providing visual tools to help you more efficiently and easily create your Obstacle. (Such as jump distance indicators)
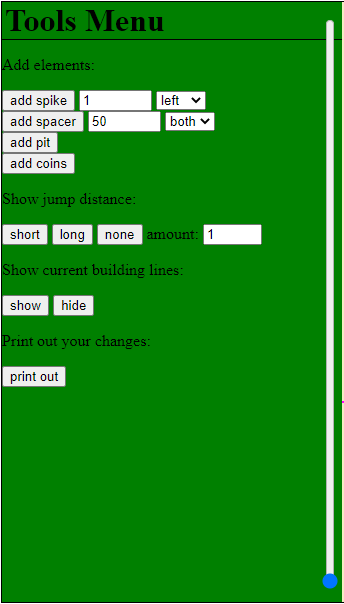
At the top we see "Add elements" written. The 4 fields under this are for configuring - and ultimately appending - the specified elements.
Adding an Element
There are 4 types of elements which you can add to your Obstacle. These are Spikes, Spacers, Pits, and Coins. Each Element has its own properties which we'll talk about later, but every element has a few things in common which I feel are important to be aware of.
The Obstacle has two sides to it. The left side, and the right side. Everything that happens on either side of the Obstacle happens independently from the other side. For example, adding 5 spikes to the left will not add any spikes to the right, nor will it affect the placement of any of the elemnts on the right side of the Obstacle. They are completely seperate.
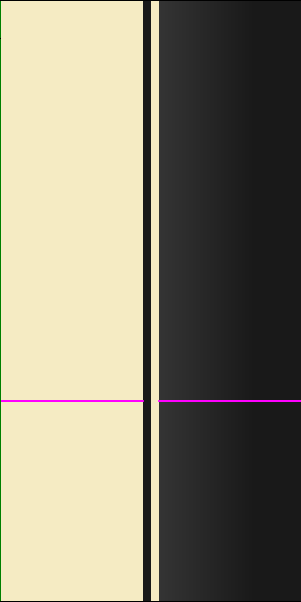
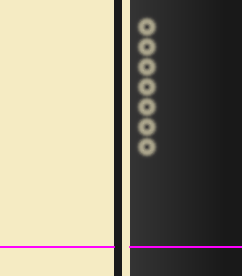
On top of this, each side has its own "building spot" which can be visualized by the "Show Building Lines" option in the Tools Menu. When an element is appended to one side of the track, it is placed at the "Building Spot" for that side of the track (Which is indicated by a magenta line if Show Building Lines is enabled). Every time an element is appended, it displaces the "Building Spot" for that side of the track based on its size. This means that if I add a Spike element with a size of 5, it will displace the side of the track that it's on by the size of one spike multiplied by 5, which is 100 (20 x 5 = 100). Then if I were to place another spike on that same side, it will be placed 100 pixels higher up than the previous spike, which prevents them from overlapping. Because of this, as you add elements to your Obstacle, it will grow longer and longer. This is a good thing! It means that you won't have to worry too much about the spacing of everything, and elements will always position themselves nicely into their places without any chance of throwing off the entire Obstacle's design. It's also just very convenient since you can spam-click the buttons to add more elements, and they'll automatically be placed perfectly without you even having to think about it.
This design might take a bit of getting used to, but hopefully it will be worth it in the end and it will feel nice for you to use.
Next, we'll take a look at how to add each individual element and give you more information about how they each interact with the Obstacle's main properties.
Every element that you add to your Obstacle will be appended to the Elements panel. You'll learn more about this panel, what it does, and how to use it later, but for now I just want to make sure that you're aware of this. Every time you create any element, whether it be a Spike, Spacer, Pit, or Coins, it will appear in the Elements panel.
Every element that you create can also be edited and deleted at any time. Nothing is final, and you can always change anything you want at any time without extra effort. Elements can also be rearranged (reordered relative to one another) after being placed, however it's best to avoid doing that too often since I was really lazy and made it relatively tedious to do so. (Sorry about that...) Just keep this in mind as you use the software though! Nothing you do is final and you don't have to worry too much about planning ahead or anything.
Adding a Spike
A Spike element is essentially a row of spikes which the player is forced to avoid. It can be either a single spike on its own, or it can be many spikes end-on-end. If the player touches any part of a Spike element then they are killed.
To add a Spike to your Obstacle, you use the "add spike" button. This will add a Spike element using the data in the two input fields to the right of the button. These fields are "size" and "side". The "size" field is the number of spikes that will be in the Spike element. 1 will be a single spike, where 5 will be 5 spikes in a row, but, no matter the amount, they will ultimately still be the same Spike element. (as opposed to creating 5 seperate elements) The "side" field determines the side of the track that the Spike object will be appended to. It can contain the values "left" and "right." It will displace whatever side of the track it is appended to by its "size" property multiplied by 20. (20 is the size of a single spike)
As soon as you click "add spike" you will see your Spike element appear in your Obstacle, and you will see that it pushes the "Building Spot" forward as well, preparing the Obstacle for its next element.
Adding a Spacer
A Spacer element is essentially a way for you to more precisely control the layout of your Obstacle. Spacer elements can be used to add space between other elements. For example, if you want to put two spikes next to each other and have a small amount of space between them for the player to land in, simply create 2 Spike elements and put 1 Spacer between them. Spacers can be any size that you'd like, from 1 to 9999.
To add a Spacer to your Obstacle, you click the "add spacer" button. This button has two fields to the right of it, the "size" field and the "side" field. The "size" of the Spacer determines the number of units that the Spacer will displace other elements. For example, a Spacer with a a size of 100 will cause any following elements to be placed 100 units away from where they otherwise would have been placed. The "side" field determines the side of the track which the Spacer will affect. This field can be "left", "right", or "both". If "both" is selected, then the Spacer will offset both sides of the track at the same time, rather than only one side or the other. (It would end up being no different than if you had just created two seperate Spacer elements of the same size and put one on each side)
Adding a Pit
A Pit is essentially a hole in the Obstacle which allows the player to travel from one side to the other.
To add a Pit element, simply click the "add pit" button. Pit elements do not take any perameters at all. They have a fixed size (of 75 units), and will simply automatically place themselves at the furthest possible point they can. For example, if the left side of the Obstacle has a "Building Spot" of 450 units, and the right side has a "Building Spot" of 700 units, then the Pit will be placed at 700 units. What's more is that, when you place a Pit element, it will cause the "Building Spots" of both sides of the Obstacle to be equal to the Pit's position plus 75. (75 is the size of the pit). This means that any elements you add after a Pit will be placed after the Pit. Even if the side that you were going to place it on had a "Building Spot" of 50, if the Pit is located at 200 units, then the next element you place will be offset by 200 units.
When you place a pit, the Building Lines will be moved to show you that the "Building Spots" of both sides of the track have updated. It sounds confusing when you read it here, but when you actually give it a try in the software it should be much more understandable since you'll be able to see the "Building Spots" moving.
Adding Coins
A coin is essentially a collectable item that, when collected, increases your score. You can put coins in your Obstacle to award players for making perfectly timed jumps, or to encourage them to take extra risks or chose one side of the track over the other.
A Coins element is much different from the other elements that we've talked about. They exist completely seperate from the Obstacle, don't have a designated "side" which they belong to, and they don't displace the "Building Spots" of the track when they're placed. Placing coins has no effect on the rest of your Obstacle. This means that you can build an entire Obstacle and then once you're finished, go back over it and add coins wherever you please without changing the layout at all. Coins also don't affect the placement of other coins! Every Coins element exists in its own world, and will not be affected or have any affect on the rest of the Obstacle.
To add a Coins element, click the "add coins" button. This will open the "Coins Maker" window (shown below) as well as cause the Coins element to appear in the Live Preview window. As you make changes to your coins in this menu, you will see the created Coins element change live.
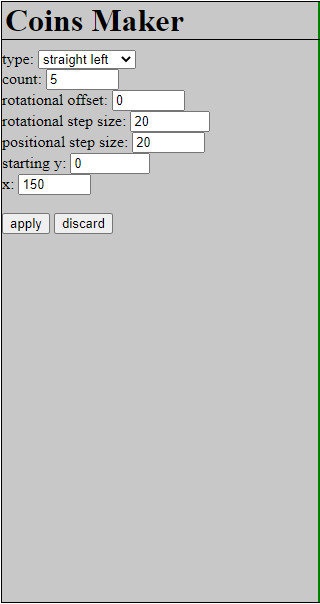
The Coins Maker window has a lot of input fields, and it can appear overwhelming at first. I think the best way to understand what all these values do is to just mess around with them and see how they affect your Coins element. However, I will still provide a brief overview of their effects for reference here: Coins Maker Reference
Once you're finished editing your Coins element and you feel that it's in the position you want, click the "apply" button. Your coins element will now appear in the Elements panel (where every element in your Obstacle resides) and the Coins Maker will close. If, at any time, you feel that you wouldn't like to append your Coins element to your Obstacle and you'd prefer to just delete it entirely, simply click "discard." (You'll have to confirm that you want to discard your changes, however)
Now that we know how to create elements using the Tools Menu, let's quickly learn about the last 3 things that the Tools menu can do for us.
The Jump Distance Idicator
The Jump Distance Indicator is simply a small tool for visualizing the jump distance of the player. This will help you determine the spacing that you should provide between your elements to make it possible for the player to navigate them. If the Jump Distance Idicator says that you didn't leave enough room for the player to land and jump again, then you might want to move your elements a bit further apart so that your Obstacle doesn't become too challenging or impossible. (Although that's entirely up to you, really.) The Jump Distance Indicator is also useful when laying out Coins elements. It can help you to make sure that your coins are reachable to the player, as well as helping you make coin waves that feel good to shoot for.
Using the Jump Distance Idicator
To use the Jump Distance Indicator, first find the area of the Tools Menu under the text "Show jump distance" There you will find 3 buttons ("short", "long", and "none") and an input field, labeled "amount". Clicking the "short" button will indicate the length of the shortest jump achievable by the player. This is the jump that is performed when the player quickly taps the jump key and immediately releases it. Clicking the "long" button will indicate the length of the longest jump achievable by the player. This is the jump that is performed if the player holds down the jump key without releasing until they reach the peak of their jump. When you're done using the Jump Distance Indicator, simply click "none" and it will dissappear.
Additionally, you can change the number of jump indicators to be displayed. If, for example, you have a large field of spikes and you want to make sure that it's not impossible to pass, you can increase the number of jump indicators shown. This will create an indicator which shows what the player's path would look like if they were to jump as fast as possible. (e.g: Jumping the moment they land every time) If you see that, after several jumps, the indicator starts to run into places you don't want the player to be, then you know that the places that you do want the player to be are, in fact, unreachable.
Building Line Indicators
The Building Line Indicators are basically two lines which shoot off from either side of the track in the Obstacle. Each one indicates the current "Building Spot" of each side of the track. They're used to help you know where your elements will be appended so that you can have a better understanding of what your Obstacle currently looks like behind the scenes, as well as allowing you to anticipate the affects of your actions and not be surprised when an element appears somewhere.
You can toggle the Building Line Indicators on and off by pressing the "show" and "hide" buttons under the text "Show current building lines"
The Print Out Button
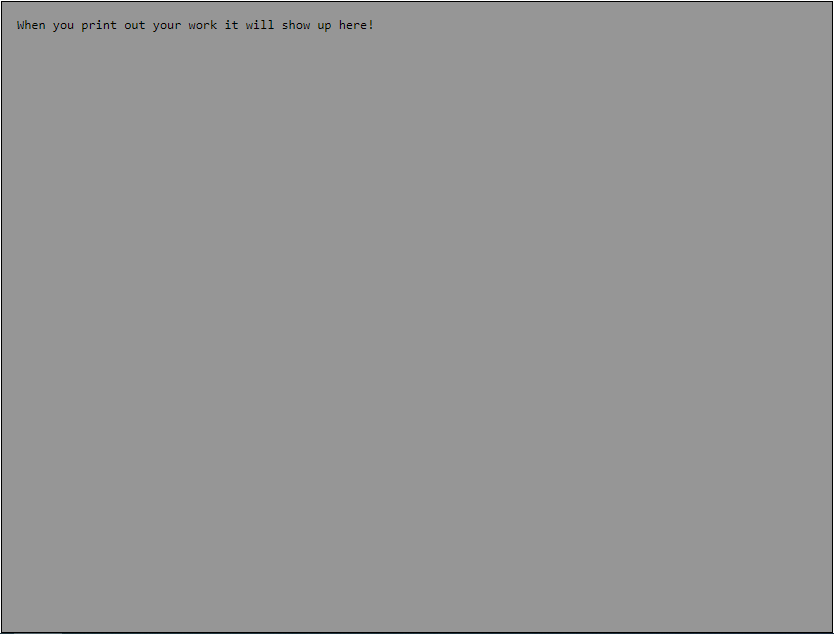
The "print out" button can be found under the text "Print out your changes". The "print out" button is very simple and straight forward. Clicking this button will print your project out to the console (as seen in the image to the left) in the form of code which the game's Obstacle Unpacker can read and understand. This outputted code is essentially your Obstacle, just written in a way that the game can understand. Pasting this code directly into the game's files will allow the game to use that Obstacle the same way it would use any other Obstacle.
You would generally only print out your Obstacle if you were going to test it or if it was completed. The print feature has no affect on the software itself, and has no purpose other than to allow your creation to be run in-game.
The Live Preview Window
The Live Preview Window displays exactly what your obstacle currently looks like, as if you were looking at it in-game. If you were to print out your changes at any time and run them inside the game itself, you would find that they look exactly as they do inside the Live Preview Window.
The Live Preview Window isn't only useful for seeing your Obstacle while you work on it. It also helps you find certain elements quickly when combined with the Elements panel, and it can also provide additional information to you through the Tools Menu's tools. (Such as your current "Building Spots" and the player's jump distance)
You can scroll the Live Preview Window up and down using the scroll bar directly to its left. This allows you to see different sections of your Obstacle.
The Elements Panel

The Elements panel is where every element resides. Whenever an element is added to the Obstacle, it's also added to the Elements panel. If an element isn't inside the Elements panel, then that element doesn't exist.
When an element shows up in the Elements list, it will appear as a small grey rectangle with the type of element written on it ("spike","pit",etc) and a small button to the right of the written word. That button has a small "x" on it. When you click that button, the element's rectangle will expand and reveal all of its options. Every different type of element has its own options. I think those options are pretty self-explanatory though, and I won't write much about them here. If you would like to learn more about what all of those options do and which elements have what options, then you can read more here: The Options of each Element
Aside from those options which are different for each element, there are some options which are always present, and which aren't entirely self-explanatory. I'll talk about those here.
In the expanded rectangle you'll find the "move up" and "move down" buttons. These buttons move the current element up and down in the elements list. This is useful if you want to move one element before another one in the flow of your Obstacle. For example, if you placed a Spike element and want to place 15 units of space before it, you can create a Spacer with a size of 15, then click the "move up" button on that spacer to place it before the Spike element in the elements list.
Finally, you'll find a "delete" button. Clicking this button will permanently delete an element from your Obstacle. (However, it will ask you to confirm that you intend to delete the element)
The Elements panel can also help you locate your elements inside your Live Preview Window. Simply hover over an element in the Elements panel and it will turn red inside the Live Preview Window. This can help you quickly find which element in the Elements panel is attached to which element in the Live Preview Window. (For example, if you want to edit a specific Spike that you see in the Live Preview Window, you can hover over each Spike element in the Elements panel until the one you're hovering over causes the Spike in the Live Preview Window to turn red. Now you know that the element you're hovering your mouse over is the element that you want to edit to change the Spike.)
Conclusion
Hopefully this Getting Started page has helped you understand the basics of the software. You should be able to start making your first Obstacles now using the software, and you hopefully have enough information to do everything you'll ever want to do. However, if you're seeking more information or if you'd like to learn more about any specific thing, feel free to explore the rest of the pages in this guide by clicking the buttons to the left or just by scrolling through the Getting Started guide again and navigating to all the links and reading what's written there. I really hope that you find what you're looking for.
Have fun!
Coins Maker Reference
In this page I'll lay out a reference for what all the inputs on the Coins Maker do. You aren't likely to ever need this information and you'll probably learn faster just by messing around with the inputs and seeing what each one does, but if you're curious or if you're looking for a deeper understanding of what each one does, then here's where you'll find that information! I hope you find what you're looking for.
The "type" Input
The "type" input at the top of the Coins Maker allows you to choose preset patterns of coins. This will help you more quickly and easily lay out coin patterns without having to manage every little detail yourself.
There are 5 patterns that you can choose from in the "type" input: "stright left", "straight right", "waved small", "waved big", and "free". Here's a deeper look at what each of those mean:
The "count" Input
The "count" input is very simple, so I won't talk about it too much. Basically, the "count" input is how many coins will be in your Coins element. Increase this number to add more coins, decrease it to remove coins. The "free" coin type will always only have a single coin no matter what though, and this input has no affect on that.
The "rotational offset" Input
The "rotational offset" input determines the offset (in degrees) of the first coin in a "waved small" or "waved big" Coins element.
For example, if you have a "rotational offset" of 0, the first coin will be placed at 0 degrees. Since the coins in a "waved small" and "waved big" selection are placed on a sine wave, a coin placed at 0 degrees will be placed at 0 (sin(0) = 0), which is the center of the screen. If you increase this number the coins will move higher off the center of the Obstacle.
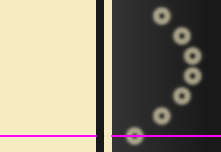
If you increase this number to 180 then your coins will start to move in the opposite direction. This is useful if you want to make a "waved small" or "waved big" Coins element on the left side of the Obstacle. If I set "rotational offset" to 15, the first coin will be 15 degrees off the right side of the Obstacle. If I set "rotational offset" to 195, the first coin will be 15 degrees off the left side of the track. Here's an image to illustrate what I mean:

The coins to the right have a "rotational offset" of 15, while the ones on the left have a "rotational offset" of 195 (which is 15 + 180).
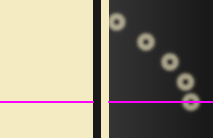
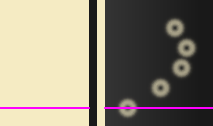
The coins in this image have a "rotational offset" of 90. Notice that this causes them to start spawning at the peak of their wave.
(The coins in these images are of type "waved big")
The "rotational step size" Input
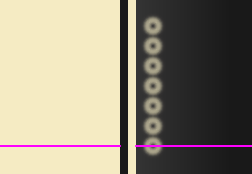
The "rotational step size" input determines the number of degrees that will be placed between each coin in a Coins element. The higher this number is, the more distance there will be between each coin in a "waved big" or "waved small" element. For example, if you have a "rotational step size" of 10 and a "rotational offset" of 20, then the coins will be placed at 20, 30, 40, 50, 60, etc.
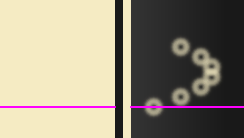
In this image we see a "waved big" selection with a "rotational offset" of 20 and a "rotational step size" of 25. Notice that the coins are relatively close together.
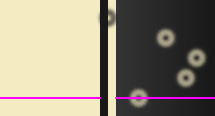
In this image we see the exact same "waved big" selection from our last image, but this time the "rotational step size" has been increased to 40. Notice that the coins are further apart. Also notice that the wave as a whole now extends further.
(Since 40 x 4 = 160 > 25 x 4 = 100)
The "positional step size" Input
The "positional step size" input is pretty simple. It's essentially the distance between each coin on the y axis. Take these images as an example:
In this image we see 7 coins in a "waved big" pattern. These coins have a "positional step size" of 20. Now watch what happens when I increase that "positional step size" to 40.
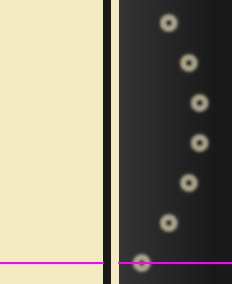
Notice that the coins are in exactly the same wave as they were before, but the only difference is that there's two times as much space between each coin! This also causes the wave as a whole to get twice as long, of course.
Here's this same coin wave, but with the "positional step size" decreased to 10:
Hopefully by seeing these mages and messing around with the editor yourself you can gain a solid understanding of exactly what the "positional step size" input does.
The "starting y" Input
The "starting y" input is very very simple. Basically what this input determines is the distance from the start of the Obstacle that you want the coins to start spawning at. Increasing it moves the coins upward along the track, and decreasing it moves the coins downward.
Here are two images to illustrate how this works:
A "starting y" of 0 makes the coins start spawning at the beginning of the Obstacle:
And a "starting y" of 100 makes the coins start spawning 100 units above the start of the Obstacle:
The "x" Input
The "x" input is only used for the "free" Coins type. It has no affect on any other type.
The "x" input determines the position of a "free" coin along the x axis. This means that, since the game world is 300 units wide, a "x" input with the value of 150 will position the coin directly in the center of the Obstacle. A value lower than 150 will place it on the left side, and a value higher than 150 will place it on the right side. The value can be any number between 0 and 300.
The Options of each Element
Every different type of element has its own options. For example, a Spike element has a "size" option and a "side" option, a Coins element has "type", "count", "rotational offset", etc, and a Pit element has no options at all! These options tend to be very straight-forward and simple to understand, but for anybody who wants more information or who is struggling to understand any part of the Elements panel, I hope this page helps you find what you're looking for. In this page, we'll look over each element's options and how to change them using the Elements panel.
We already discussed what these options do in the Getting Started page, so I won't cover that here. What I will be covering here is how to use these options from the Elements panel after an element has already been created.
The Spike Element
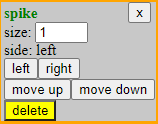
In the Spike element's dropdown rectangle, we see a "size" field and a "side" field. These correspond to the Spike's two options, "size" and "side".
To change the Spike's "size", simply click the up and down arrows on the input field to the right of the "size" label. Alternatively, you can also type in your own value and press ENTER on your keyboard.
To change the Spike's "side" option, simply click the "left" or "right" buttons. This will cause the Spike to immediately switch sides.
The Spacer Element
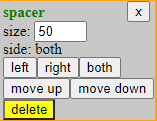
In the Spacer element's dropdown rectangle, we see a "size" field and a "side" field. These correspond to the Spacer's two options, "size" and "side".
To change the Spacer's "size", simply click the up and down arrows on the input field to the right of the "size" label. Alternatively, you can also type in your own value and press ENTER on your keyboard.
To change the Spacer's "side" option, simply click the "left", "right", or "both" buttons. This will cause the Spacer to immediately update its "side" option.
The Pit Element
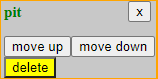
The Pit element doesn't have any inputs inside its dropdown rectangle. This makes sense since Pit elements don't have any options since they automatically place themselves and have a fixed size of 75 units. There's not much to discuss here!
The Coins Element
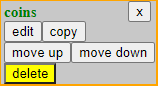
In the Coins element's dropdown rectangle, we don't see any input fields. Instead we simply see a "edit" button and a "copy" button.
Pressing the "edit" button will open the Coins Maker window and allow you to edit the Coins element just as you did when you originally created it. From inside that window you can edit every aspect of the Coins element.
If you want more information as to all the things that can be done from within the Coins Maker, click here: Coins Maker Reference
If you want to learn how to use the Coins Maker, click here: Getting Started
Pressing the "copy" button will simply duplicate the Coins element. This will create an exact copy of the Coins element which will exist completely seperate from the current Coins element. The "copy" button is useful if you want to put several of the same coin patterns on the same Obstacle, but don't want to re-create the whole thing from scratch. The "copy" button is also useful if you created a "waved small" or "waved big" Coins element, and you want to duplicate it onto the other side of the Obstacle as well. Simply click "copy", open the new Coins element's dropdown rectangle, click "edit", and add 180 to the "rotational offset" option. Now you have two identacle Coins elements on opposite sides of the Obstacle!
The Three Types of Obstacles
There are three different types of Obstacles in Twins - Remastered. This page will talk about each of those three types.
The type of an obstacle isn't too important to the person creating Obstacles (that's you), it's mostly just important to the game itself. When you're adding a completed Obstacle to the game, you need to decide what type of Obstacle your Obstacle is, but until then you won't have to think about it at all.
The three types of Obstacle are Regular Obstacles, Single-only Obstacles, and Twin-only Obstacles.
A Single-only Obstacle is an Obstacle that can only spawn when there is a single player alive. (Not when there are 2 players alive) An Obstacle becomes a Single-only Obstacle when it has a Pit element which the player is forced to go through (one that can't be jumped over on both sides of the track). This is because when two Twins hit each other, one of them always dies. So a pit that can't be jumped over is essentially an unavoidable death to one player. Because of this, we want Obstacles which contain unavoidable Pits to be categorized as Single-only Obstacles. This will prevent the Obstacle from spawning in when there are two players alive, which will prevent moments of unavoidable death.
A Twin-only Obstacle is an Obstacle that can only spawn when there are two players alive. (Not when there's only one) An Obstacle becomes a Twin-only Obstacle when there are coins on both sides of the Obstacle that can't all be collected by one player. For example, if I have coins on one side, followed by a Pit, follow by coins on the other side, then that's fine, because the player has an opportunity to switch sides at the Pit's location and still can potentially collect all the coins. However, if I have coins on one side and coins on the other side without a pit in between, then this Obstacle becomes a Twin-only Obstacle, since there are coins which can ONLY be collected if there are two players alive.
The only exception to this is if you make both sides equally rewarding so that no matter which side the player is on they still get rewards. (For example, I made a Single-only Obstacle which is in the final release of the game which has two crossed-over coin waves. This is so that no matter which side the player is on, they still get to collect a whole bunch of coins in a fancy way.)
Finally, we have Regular Obstacles. A Regular Obstacle is an Obstacle that doesn't need to be Single-only, and also doesn't need ot be Twin-only. A Regular Obstacle is an Obstacle which can be played perfectly whether there's one or two players alive.
Set up the Game for Modding
In this page we'll learn how to download the game's files and set up an IDE so that you can mod the game yourself. After following the steps here you'll be all set up and ready to mod the game however you like. Following these steps will also allow you to play and test the obstacles that you create by adding them to the game's files.
For more information about running your Obstacles, click here: Running your Obstacle
Step 1: Download Source Code
The first step is to download and unzip the source code of the game. This will be every line of code, and every dependency that the game runs with. Once you finish this step you'll see all the game's files.
So first, we'll download the source code. Click this link to start the download: Twins - Remastered Source Code
Once your download finishes, go ahead and navigate into the folder that you downloaded the .zip file to.
Unzip the .zip file to wherever you'd like on your PC. Once it's unzipped, navigate into the folder you unzipped it to, open the "twinsremasteredsourcecode" folder, then open the "Twins - Remastered (Source Code)" folder.
You should see something similar to this:
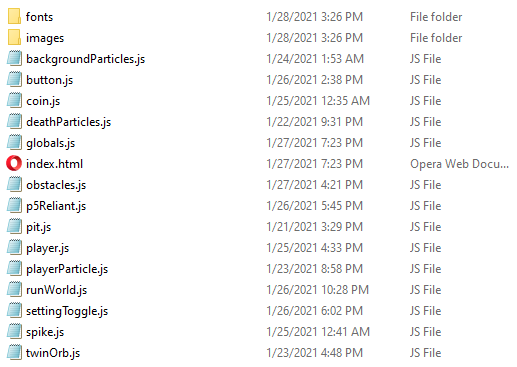
If you see files similar to what is pictured above, then that means you did everything perfectly! Good job. Now you can move on to the next step.
Step 2: Installing your IDE
In order to run the game you will need an IDE. If you already have an IDE that can run JavaScript applications then you can skip this step, however I can't guarantee that they'll be configured properly to run this game's files. (For example, they may give you a "Fetch API cannot load file" error) Because of this, I highly recommend that you use Adobe Brackets IDE. Adobe Brackets is the IDE that I used to develop the game, and I can guarantee that it will run there without any hassle or any extra steps.
To get Adobe Brackets running, first download and install Adobe Brackets from this link: Adobe Brackets
That page will walk you through how to install Adobe Brackets and how to get it set up and ready to use. It should take you about 5-15 minutes from start to finish. Once you're done with that, continue below:
Step 3: Running the Game
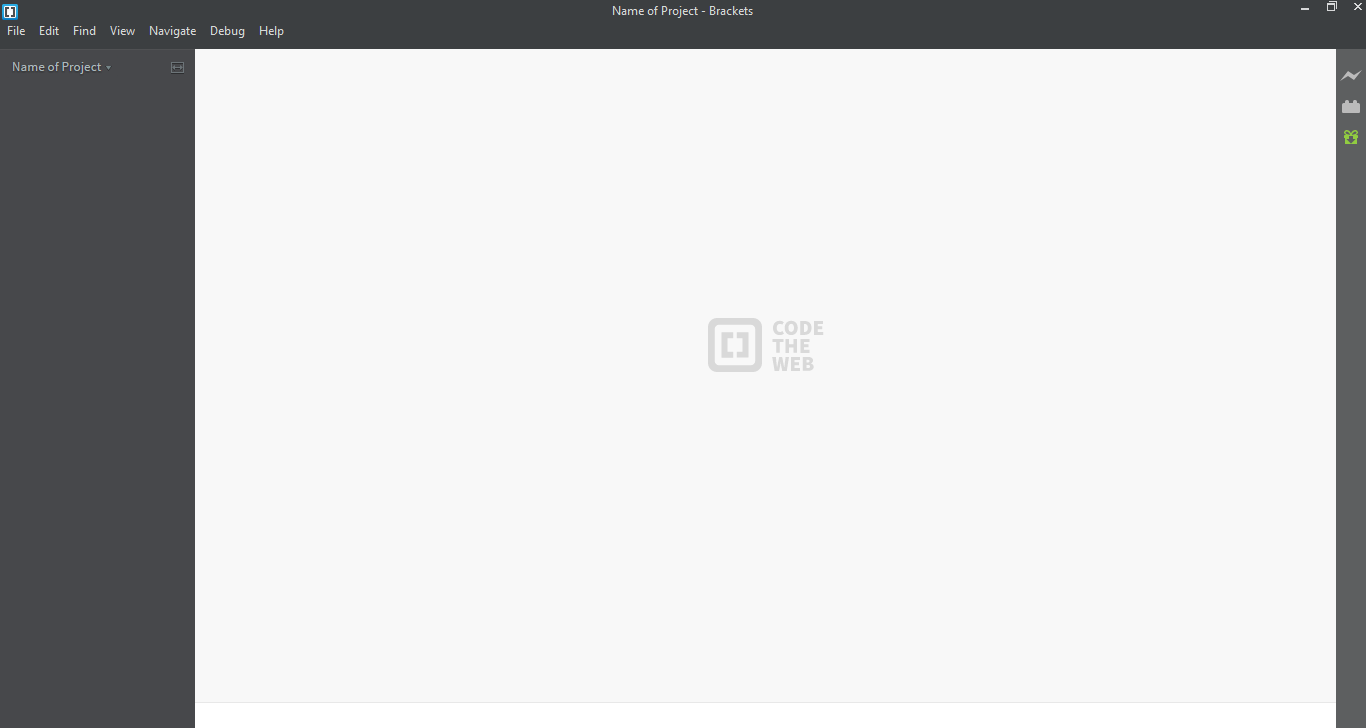
This step will be different depending on what IDE you're using, but I'll show you how to launch the game using Adobe Brackets on Windows 10.
First, launch Adobe Brackets. It should look like this:
Then, click on the button in the upper left of the screen. In my case, it says "Name of Project"
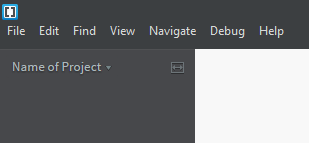
Then click the "Open Folder..." button
Now navigate to the location where you unzipped the source code folder. Your final destination should look like this:

Once you're in the correct folder (it will look like it looks above if you're in the right place), click the "Select Folder" button in the bottom right.
Brackets should now appear like this:
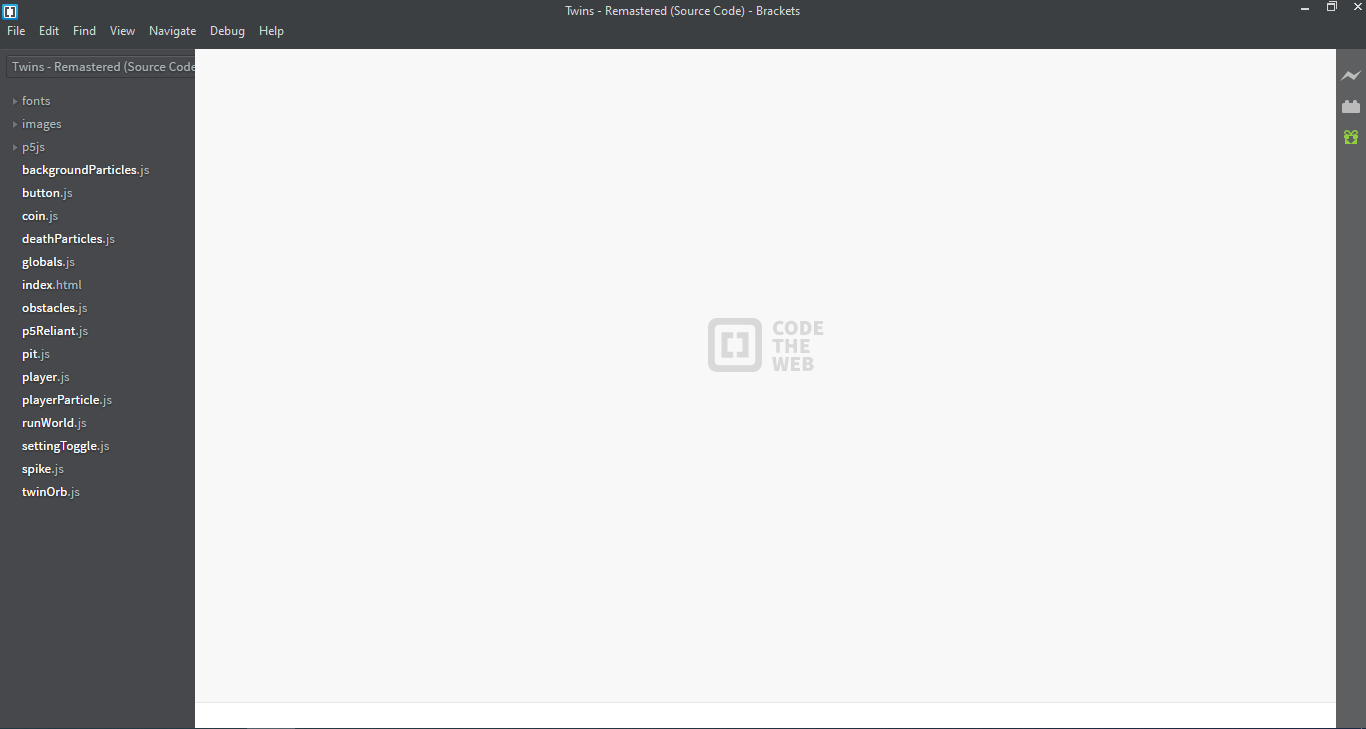
Along the left side of the screen, you should see a list of a whole bunch of files. Feel free to click on any of those and read what they contain.
When you're ready to run the game, click on the lightning bold symbol in the upper right of the screen.
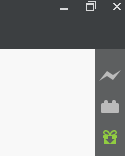
After a few seconds you should see a new browser window be opened and the game should be running inside that window! If you see the game running then that means you did everything perfectly and you're 100% ready to mod!
And you're Done!
Congratulations! You're now ready to mod the game however you want. You can change any of the code files inside Adobe Brackets, and when you refresh your browser page the updates will take effect. You now have full control over every aspect of the game. Have fun with it!
If you would like to import your Obstacles for testing and playing, this page will tell you everything you need to know about that process: Running your Obstacle
Running your Obstacle
Before you'll be able to follow the instructions on this page, you'll need to complete the process listed on this page: Set up the Game for Modding
Once you've completed the steps on that page, feel free to move on!
This page will assume that you're using Adobe Brackets IDE, but this can be done with any IDE as long as you've set it up correctly.
Step 1: Locate the Existing Obstacles
Open up the "obstacles.js" file inside the game's source code inside your IDE. Inside that file you'll find three variables called "obstacles", "singleOnlyObstacles", and "twinOnlyObstacles". (If you don't know what the difference between each of those is, please read The Three Types of Obstacles) Each of those variables contains an array of functions, and each function inside those arrays is one Obstacle.
Step 2: Create your Obstacle
If you haven't already, now would be a good time to create your Obstacle that you want to add to the game. If you don't know how to do that, please read: Getting Started
Now is also a good time to decide what type of Obstacle your Obstacle is. Is it a Regular Obstacle, is it a Single-only Obstacle, or is it a Twin-only Obstacle? (If you don't know what that means, please read The Three Types of Obstacles) Once you've decided you can move on to the next step.
Step 3: Print out your Obstacle's Function
Click the "print out" button in the Tools Menu on the left side of the screen in the Obstacle Creator. Your Obstacle is now printed out to the Obstacle Creator's console in its function form.
Now scroll down to the console in the Obstacle Creator, and copy every letter of text inside the console to your clipboard.
Now you're ready to paste your Obstacle's function into the game's code!
Step 4: Add your Obstacle's Function to the Code
Open back up your IDE and find the correct variable for the type of Obstacle you've created. (Either "obstacles", "singleOnlyObstacles", or "twinOnlyObstacles") In the space right before the first Obstacle in that array, paste your Obstacle.
(In the GIF above I added a Regular Obstacle to the "obstacles" array)
Also make sure to properly indent the code that you pasted in, and add a comma after it to seperate it from the rest of the Obstacles in the array. Save your work (in my case, I pressed Ctrl + S) and you're done!
Congratulations! Your Obstacle is now in the game! You can launch the game and play through it until you come across your Obstacle, or, if you don't want to wait, you can force the game to load only your Obstacle by using the built-in "Debugger Mode" of my game! If you'd like to use the Debugger Mode built into the game, then continue on to the next step and I'll tell you how.
Debugger Mode
The game has a Debugger Mode built in which allows you to force it to spawn any Obstacle you want. This is useful if you want to test your Obstacle or you just want to see it in-game without having to wait for it to randomly spawn in.
To use the Debugger Mode, first open the "globals.js" file in your IDE. Scroll down to line 76 (or somewhere around line 76) and look for a line that reads "let debugging = 0;". To enable Debugger Mode, you simply change this variable to 1, 2, or 3. To disable Debugger Mode, set this variable to 0.
When "debugging" is set to 1, the game will repeatedly spawn the first Obstacle in the "obstacles" array. If you created a Regular Obstacle and you pasted it into the "obstacles" array, then set "debugging" to 1 to see your Obstacle spawned repeatedly.
When "debugging" is set to 2, the game will repeatedly spawn the first Obstacle in the "singleOnlyObstacles" array. If you created a Single-only Obstacle and you pasted it into the "singleOnlyObstacles" array, then set "debugging" to 2 to see your Obstacle spawned repeatedly.
When "debugging" is set to 3, the game will repeatedly spawn the first Obstacle in the "twinOnlyObstacles" array. If you created a Twin-only Obstacle and you pasted it into the "twinOnlyObstacles" array, then set "debugging" to 3 to see your Obstacle spawned repeatedly.
When you're done testing your Obstacle, simply set "debugging" to 0 and the game will go back to normal.
How to Run your Obstacle with 2 Players
What if you want to play your Obstacle with two players at the same time instead of just one player? Well, it's pretty simple.
First, open up "index.html". Scroll down to line 494 (or somewhere around there). You should see a long label that reads "This is where the player spawns", and directly above that label you'll see two lines of code that appear as follows:

When you see this code it means that one player will spawn at the start of the game. To make two players spawn instead of one, simply uncomment the second line (the one that is green in that picture) by removing the "//" before it. Now, relaunch the game and when you press play two players will spawn instead of one!
When you would like to put it back to normal, simply comment out that second line again (by putting the "//" back in front of it), and relaunch the game. Now only one player will spawn.